Tuesday, January 25, 2011

Pretzel Dogs


Everytime I go to the mall, I love to stop at one of food court stands where they sell pretzels. My favorite are the pretzel dogs. I ended up going to a local wholesale club and found that they sold a kit to make the pretzels and pretzel dogs at home from the same stand. While that was good, I ended up using all the ingredients up and decided, why not figure out a way to make this at home. And make it easier. Which I did.

Pillsbury came out an amazing product that can be used for multiple things, Recipe Creations. I've used this to make many different things, from pinwheels, to pepperoni rolls, to the above pretzel dogs. All extremely easy and delicious.

This would be a great treat for a party, Superbowl maybe? Or of course making the infamous mummies for Halloween.

Pretzel Dogs
Makes 8 single servings.

Ingredients:
1 can Pillsbury Recipe Creations
1 8 pack of hotdogs
Pam or butter for the pan


Directions: 
Preheat your oven to 350*F. Place the hotdogs in a container filled with hot water. Cover the dogs completely and cover the container with a lid for 5 minutes. Unroll the recipe creations dough. Use a rolling pin to slighly flatten the dough a little bit. Then using a pizza cutter, slice the dough into even vertical strips. You'll probably end up with more then 8 at this time. You can do whatever you like with the excess of course.

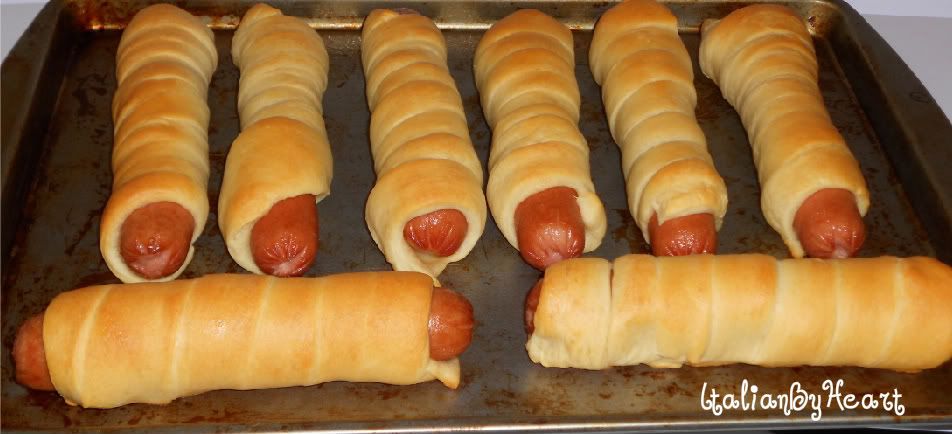
Drain the hot dogs after the 5 minutes are up. Grease a sheet pan with either Pam or lightly with butter. Then grab two paper towels to pat dry the hot dogs. The less wet they are the easier to work with. Taking one strip of the dough, starting at the top wrap the hot dog from top to bottom, leaving a little bit of the hot dog peeking out of the top and bottom. Place them on the greased sheet pan. Repeat the process for the remaining hot dogs.

Bake at 350*F for 10-12 minutes, or until golden brown to your likely. Usually the last minute or so before I'm ready to pull them out, I will brush the tops of them with butter. Allow to cool and serve with your choice of condiments.

Wednesday, January 12, 2011

Chicken Quesadilla

I've been searching high and low to find new things to make that will appease both my boyfriend and I. More so him, as he's a very picky eater. I had just made tacos a couple nights before and as I'm the one that likes the soft tacos I still had tortillas left. Then, I came across a recipe for a quesadilla. I've seen a lot of recipes for them before but I never clicked on them as I just figured that's not something I would want to make. The recipe I found wasn't for a chicken one, it was for a stirfry one. Definitely not something  my boyfriend would eat. So, I decided to alter it to our tastes and came up with this one.

Our local grocery store sells already cooked chicken in a package. I was initially looking for some sort of ready to eat shredded chicken but this Tyson's happened to be on sale, 2 for $3.98, so I decided to try that instead. I figured this was a quick and easy dinner that would be easy on the budget and it was. You can definitely choose your own way of doing the filling. Either use this ready to use chicken, make up your own, or even use another kind of filling. Tyson also had the steak pieces on sale as well so I picked up one of those to try too.

Chicken Quesadilla's

Ingredients:
1 6oz package ready to eat chicken (one package equaled out to two quesadilla's so adjust accordingly if you want to make more.)
1 8oz package shredded cheese (any kind that you would like will do, I used sharp cheddar)
1 package flour tortillas
Butter

Directions:
Heat a pan over low-medium heat. Melt a tablespoon of butter in the pan. Lay one flour tortilla over the melted butter. Sprinkle cheese over the tortilla, followed by the chicken pieces, and then more cheese for good measure, making sure there is cheese along the outer side of the tortilla. Press the another tortilla over the top. Flatten down.

Now if you're like me and have trouble with using the spatula to flatten it down, feel free to use your hand. I sure did! It makes it much easier to flip if it's flattened down. And with the cheese on the outer side of the tortilla it helps to stick both tortillas together.

Let cook until the bottom is brown to your liking, then pick it up to flip, melting a little more butter if necessary in the pan, before placing it down on the other side. Brown to your liking, place on a dish, cut, and enjoy. It's delicious and hearty enough to fill us both up.

Tuesday, January 11, 2011

Blueberry Streusel Muffins


I had a pint of blueberries I had bought last week and still hadn't touched sitting in my fridge. When I was trying to figure out what to do with them, I was reminded of some amazing blueberry muffins my brother had made years ago. He had gotten the recipe off of the foodnetwork site via Emeril Lagasse. I have been unable to find that recipe since, sadly. I took a shot though with this recipe from Emeril Lagasse and while not the same as the ones he had made for me many years ago, they were still delicious. The only thing I probably would have changed would have been to add more of the topping. 

I also didn't have all the ingredients needed, but regardless they still turned out great I think. The recipe is below is linked below, as I made a lot of alternations since I didn't have a few of the ingredients. I'm still on my quest to find those exact muffins, but for now? These will do in a pinch.

Homemade Macaroni & Cheese


Almost everyone nowadays has a homemade macaroni and cheese recipe up their sleeve. I am now no different. Homemade Macaroni & Cheese is my boyfriends favorite food around the holidays and it took a lot of tries but I finally found one that is worthy of praise in my book. This is definitely a staple around the house during those times.

Lasagna Rolls With Homemade Meat Sauce


I love making Lasagna. When I do I usually throw a lot of stuff into it and it ends up taking a lot of time. So, instead I came up with this alternative, which I've found I'm not the only one, but I added my own spin to it, even though the ingredients are pretty basic.

Lasagna Rolls With Homemade Meat Sauce

Ingredients:
1 Box Lasagna Noodles (cooked as directed on box)
1 2lb (32oz) Bag Of Shredded Cheese (I used Mozzerella)
Parmesan Cheese (I just ended up using the kind you would put on top of spaghetti)
Parsley Flakes
Homemade or store bought sauce of your choice


Prepare your sauce. Whether you are doing a homemade sauce or doctoring up a store bought sauce.


Spread your sauce in the bottom of either a glass Pyrex dish or another pan of your choosing. After the first time making this, I ended up instead using a cake pan as it held all the noodles instead of me having to use two separate pans.


Mix your cheeses together with the parsley flakes. Lay out a single or if you're feeling adventurous and want to get done faster, a couple of lasagna noodles. Fill each noodle with cheese from top to bottom. I find using a cup of some sort helps make less of a mess. After filling the noodle, roll it up from bottom to top, please seam side down into the pan, so they don't unroll.


Spread what's left of your sauce on top of the rolls, sprinkle with cheese, and bake in a 350*F oven for 30-45 minutes, until desired browning of cheese is reached. Enjoy!